OctoBot Troubleshoot
After installation, OctoBot starts in node mode and opens its node interface. From there you can:
- Run automations configured and monitored from the new OctoBot interface or the mobile app (recommended for most users).
- Launch manual OctoBots with their own interface, deeper configuration and the backtesting engine (for expert users).
See the getting started guide for setup steps, or the connect guide if you have connection issues.
After installation: Starting your OctoBot
- Open the node setupOpen
http://localhost:8000on the PC where OctoBot is running. The node setup screen opens in your browser. - Set up your node walletOn the node, create or import your node wallet to secure your node and its data. This wallet is not a cryptocurrency wallet, do not use a crypto wallet private key and never share your private key with anyone.
- Connect your Node to your OctoBot interfaceFrom the Connect your Node to your OctoBot interface step (or Settings → Connect → Web tab), open new.mobile.octobot.cloud. I already have a wallet → I already have a private key. Paste Copy your private key from this node. Then new automation → any type → Add a node → Existing install. Hostname: the hostname or IP the node shows. Port: 8000 (or what the node shows). Click Save when the checks turn green. Still Unreachable? Check our connection troubleshoot.
- Launch your first OctoBotOn new.mobile.octobot.cloud, leave demo mode on (default for risk-free simulated trading). Add an exchange account with 1000 USDC (or the crypto of your choice). Start a new automation (for example a Grid on BTC/USDC, if you added USDC to the demo account) and follow your automation from your OctoBot interface.
- Your node is now executing your strategyWhen you start an automation, the node runs it on its computer. You do not need to keep the browser tab or app open. Just leave the OctoBot program running so that it keeps trading. You can run as many automations as you want, on most crypto exchanges, with demo and real accounts. When needed, feel free to stop and restart your node, it will resume trading when you turn it back on.
Use new.mobile.octobot.cloud or the iOS or Android app on a regular basis to follow your investments and turn automations on and off. Go back to the node interface at http://localhost:8000 only for configuration, administration, or to connect to a new phone or computer.
Connection problems? Read the Node Connect Guide. If your node shows Unreachable, see connection common issues.
Cannot connect new.mobile or the apps to my node
On the same PC as the node, use http://localhost:8000 for the node UI and link with localhost or 127.0.0.1 in new.mobile.octobot.cloud. For any other hostname or IP (LAN, cloud, Tailscale), the node URL must be https://, not HTTP.
The web app can list your node but show Unreachable when it cannot talk to the node program. Queued actions (for example saving credentials or adding an account) stay waiting until the connection works. They mean the link failed, not that OctoBot already saved them on the node.
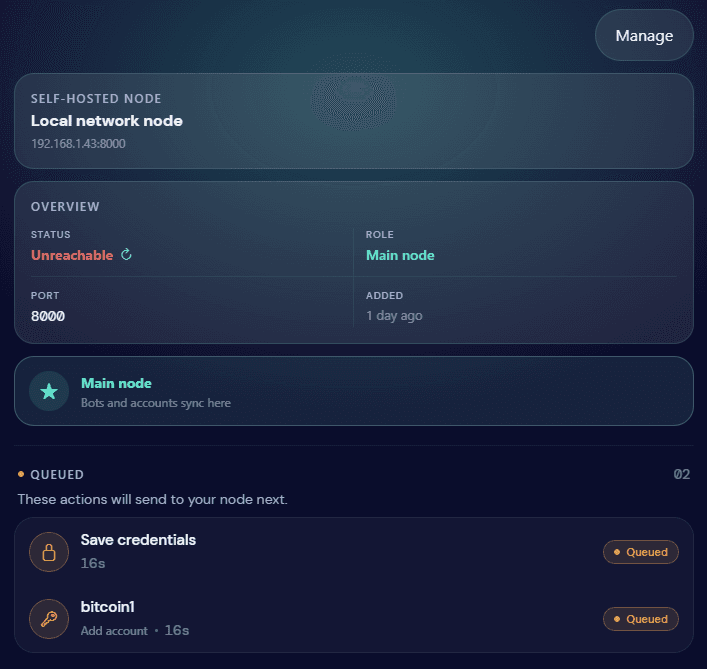
See the full connect your node to the new interface guide (including what a failed connection looks like and Tailscale).
Keeping the same configuration and history when updating OctoBot
On OctoBot, the user folder, located in the directory you are executing OctoBot from, contains:
- Your current configuration
- Your profiles
- Your portfolio history
- Your trades and PNL history
In order to keep the same configuration and history when using another version of OctoBot, you can either:
- Copy the
userdirectory of your previous OctoBot into your new OctoBot folder. - Or execute the new OctoBot in the same directory as the previous one. Warning: the
tentaclesfolder will be replaced by its new version.
Keeping the same backtesting data files when updating OctoBot
When updating your OctoBot, you might want to keep your previous backtesting data files.
For your new OctoBot to access your backtesting data files, just copy the backtesting directory (located in the directory you were executing your previous OctoBot from) into your new OctoBot folder.
Windows
Time synchronization
This issue happens when error messages such as 'recvWindow' must be less than ... appear.
Open an administrator terminal (Win + X then A) and type:
net stop w32time
net start w32time
w32tm /resync
w32tm /query /status
Code from serverfault.com
Another solution found by @alpi on discord channel: timesynctool.com
OctoBot freeze
When running OctoBot on Windows, clicking into the OctoBot terminal (Powershell or Cmd) can freeze the log output and therefore freeze OctoBot execution (OctoBot will be waiting for the log to be published to continue).
To fix this issue, untick the “QuickEdit Mode” in your terminal properties and restart it.


To open the properties menu, right click on the terminal window header and select “properties”.
CentOS
Install OctoBot on CentOS
Requirements
yum -y update
yum install -y git wget sqlite-devel screen
yum -y groupinstall "Development Tools"
yum -y install openssl-devel bzip2-devel libffi-devel
yum install -y screen
cd /root
wget https://www.python.org/ftp/python/3.10.11/Python-3.10.11.tgz
tar xvf Python-3.10.11.tgz
cd Python-3.10*/
./configure --enable-loadable-sqlite-extensions && make && sudo make install
OctoBot
git clone https://github.com/Drakkar-Software/OctoBot.git
cd OctoBot/
python3.10 -m pip install virtualenv
virtualenv venv
source venv/bin/activate
pip install -Ur requirements.txt
python start.py
Linux
Time synchronization
This issue happens when error messages such as 'recvWindow' must be less than ... appear.
On Debian or Ubuntu, open a terminal and type:
sudo service ntp stop
sudo ntpd -gq
sudo service ntp start
Requires ntp package installation sudo apt-get install ntp.
Code from
Installation
During pip install if you have SSL problems, open a terminal and type
pip3 install service_identity --force --upgrade
